This post covers how to set up a local SSL WordPress site. These instructions assume you’re on a Mac and use Varying Vagrant Vagrants (VVV) for local development.
cd into the directory where all the .conf files are for your local sites
cd ~/vagrant-local/config/nginx-config/sites
Create a new “ssl” directory
mkdir ssl
cd into the new ssl directory
cd ssl
Generate an SSL Key and Certificate
The commands below will create new example.dev.key and example.dev.cert files.
Replace example.dev with your development site domain.
openssl genrsa -out example.dev.key 2048 openssl req -new -x509 -key example.dev.key -out example.dev.cert -days 3650 -subj /CN=example.dev
Edit .conf File
Go up one directory level and open the .conf file for the site you want to enable ssl on. Add these lines at the bottom, before the server {…} closing curly brace. Again, replace example.dev with your development site domain.
ssl on; ssl_certificate /srv/config/nginx-config/sites/ssl/example.dev.cert; ssl_certificate_key /srv/config/nginx-config/sites/ssl/example.dev.key;
Set Cert as Trusted
Open the “Keychain Access” application, in Finder > Applications > Utilities.
Drag and drop the cert file into the application window.
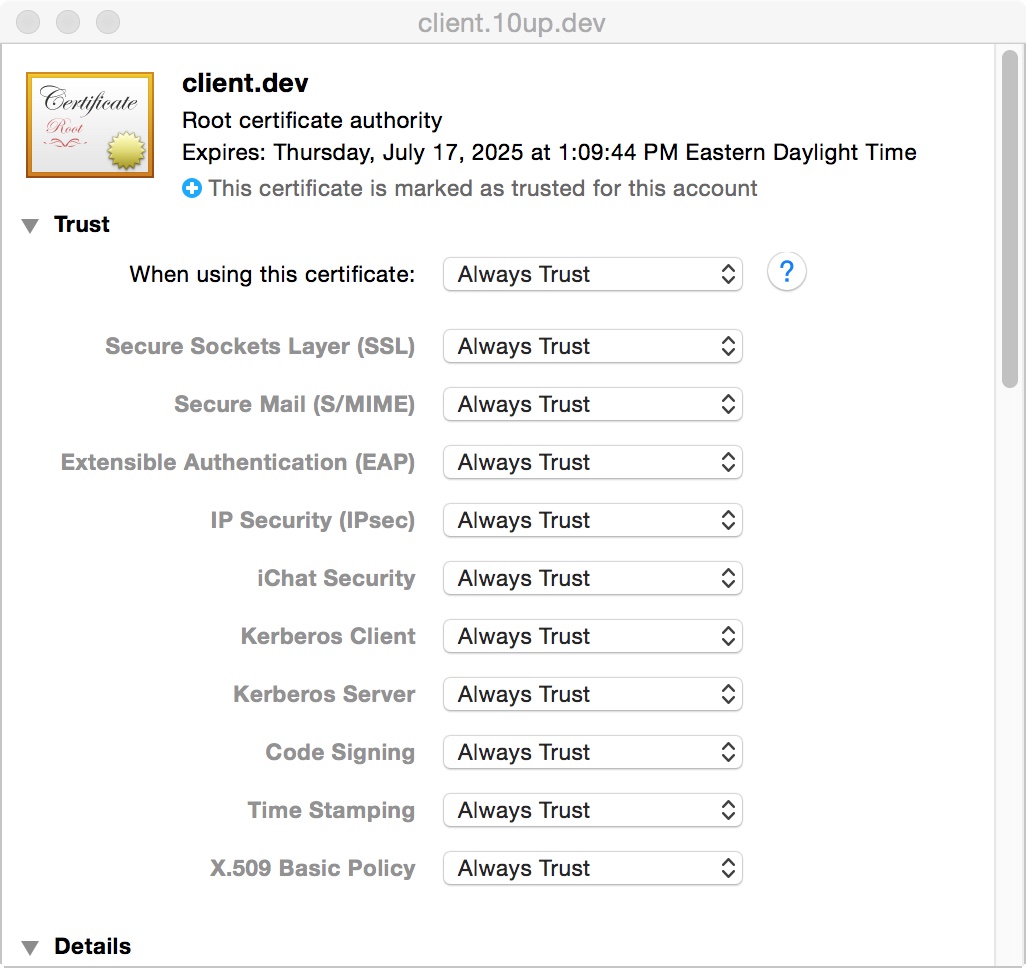
Search to find the cert you just added, double-click to open it and change to “Always Trust.
Provision Vagrant
Run this to provision your Vagrant virtual machine and ensure you updated the .conf file correctly.
vagrant provision
Now you can convert your WordPress site to SSL, if you haven’t done so already.
When visiting the site, you will get a warning message similar to “This site’s security certificate is not trusted!”, which is is expected. The browser’s telling you that it cannot verify the identity of the server you are trying to connect to because it isn’t signed by a trusted SSL certificate authority. Since we created a self-signed certificate, this makes sense. Just click “Proceed anyway”, “Continue”, or whatever similar option is available and you’ll see the site. Also ignore the “https” in the address bar that is highlighted in red, or with a strikethrough to indicate the untrusted certificate – that’s not a problem.
Useful VVV-specific guide: https://github.com/Varying-Vagrant-Vagrants/VVV/wiki/Site-specific-self-signed-SSL-certificates
Here’s another very comprehensive article DART Creations has written on setting up SSL on WordPress sites in gereral (not just locally on VVV): https://www.dart-creations.com/wordpress/wordpress-tutorials/wordpress-ssl.html
8 comments
Jacob August 11, 2015 at 12:11 pm
Saved me a bunch of time. Thank you!
Kellen Mace August 11, 2015 at 12:20 pm
Awesome – glad to hear it! You’re very welcome.
Tyler October 6, 2016 at 9:46 pm
Hi, where is this path going to be after I install vvv: {vvv_path_to_folder} ? I’ve tried all the following values in my default.conf file, and all of them return a file not found exception:
/srv/ssl/local.wordpress.dev.cert
~/Development/vagrant_local/ssl/local.wordpress.dev.cert
/~/Development/vagrant_local/ssl/local.wordpress.dev.cert
/Users/[myusername]/Development/vagrant_local/ssl/local.wordpress.dev.cert
Users/[myusername]/Development/vagrant_local/ssl/local.wordpress.dev.cert
Tyler October 6, 2016 at 11:25 pm
***Update**
I also tried {vvv_path_to_folder}/ssl/local.wordpress.dev.cert, thinking maybe the curly braces are a special syntax that actually replaces the variable or something, but when I do that, i get the error: ‘default: nginx: [emerg] directive “ssl_certificate” is not terminated by “;”‘
Kellen Mace October 7, 2016 at 12:00 am
Hey Tyler,
Assuming all the .conf files for your local sites are located in ~/vagrant-local/config/nginx-config/sites/ (here’s an image showing what that looks like for me: https://cloudup.com/cL5jLVzxfjO) and your local site is example.dev, the .key and .cert files you create will be located here on your local machine:
~/vagrant-local/config/nginx-config/sites/ssl/example.dev.key
~/vagrant-local/config/nginx-config/sites/ssl/example.dev.cert
The .conf file for the example.dev site will be located here:
~/vagrant-local/config/nginx-config/sites/example.conf
And the code you paste at the bottom of the server {} block in that file will look like the following (notice that these are the vagrant virtual machine paths to the .cert and .key files, not the paths to those files on your local machine. I’ll update the post to reflect that).
ssl on;
ssl_certificate /srv/config/nginx-config/sites/ssl/example.dev.cert;
ssl_certificate_key /srv/config/nginx-config/sites/ssl/example.dev.key;
I think that’s all correct. I haven’t set a local ssl site up since I wrote this post :). A few last notes:
– If you’re trying to do this with the local.wordpress.dev site, you would need to paste the code above into the server {} block that says “WordPress stable nginx configuration” – there are several of them in the default.conf file. I’ve never set up ssl using the local.wordpress.dev site, so I can’t guarantee it works, but I know it does when using a newly created site.
– If you want to way to easily create new sites locally, I recommend checking out https://github.com/bradp/vv
Best of luck! Please let me know if you run into any other issues.
Tyler October 12, 2016 at 8:20 am
That worked! Thanks for the detailed help.
Pingback: SSL Instructions on shared GoDaddy server with a WordPress Site – King Luddite
Ian December 27, 2017 at 7:09 pm
Hi Kellen,
Looks like this post is a gift that keeps on giving 🙂
I’ve been locked out of my sites with the SSL thing on all browsers for a couple of weeks. I followed the info from vvv GitHub page but the info wasn’t clear when it came to the folder structure and location.
You’re a great communicator, your instructions were clear and didn’t miss any steps and you’ve saved me a few hours of frustration.
Thanks so much :_)